web analytics
Pumpkin Spice Muffins

Pumpkin Spice Muffins

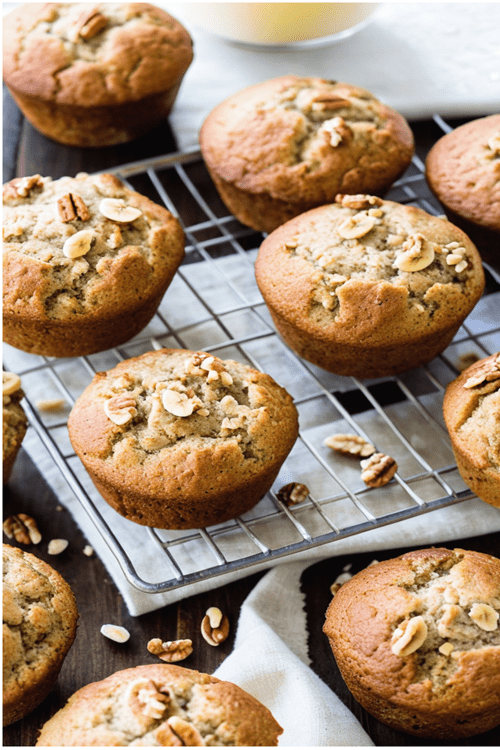
It’s a crisp autumn afternoon, the leaves outside your window beautiful shades of gold, orange, and red. As you step into your kitchen, the warm, inviting aroma of Pumpkin Spice Muffins fills the air, inviting you to grab a plate full and enjoy them by the fire. 

As you take a bite, the tender, moist crumb of the muffin reveals a delightful mix of warm spices – cinnamon, ginger, nutmeg, and cloves – that dance on your tongue and warm your soul. 

These muffins are a perfect treat for those managing diabetes, as they’re made with almond flour, pumpkin puree, and natural sweeteners such as allulose or monk fruit extract. The natural sweeteners provide just the right amount of sweetness without raising blood sugar levels, making these muffins a guilt-free indulgence. 

Enjoying these Pumpkin Spice Muffins with a steaming mug of coffee or tea, you feel a sense of warmth and contentment wash over you. As with a few simple ingredient swaps, these muffins allow you to enjoy a sweet treat without sabotaging your health.

Ingredients

– 2 cups almond flour

– 1/2 cup allulose or monk fruit sweetener

– 1 tsp baking powder

– 1/2 tsp baking soda

– 1 tsp ground cinnamon

– 1/2 tsp ground ginger

– 1/4 tsp ground nutmeg

– 1/8 tsp ground cloves

– 1/4 tsp salt

– 1 cup pumpkin puree

– 2 large eggs

– 1/4 cup melted coconut oil or butter

– 1 tsp vanilla extract

Instructions

1. Preheat your oven to 350°F (175°C). Line a 12-cup muffin tin with paper liners or grease with cooking spray.

2. In a large bowl, whisk together the almond flour, sweetener, baking powder, baking soda, cinnamon, ginger, nutmeg, cloves, and salt.

3. In a separate bowl, combine the pumpkin puree, eggs, melted coconut oil or butter, and vanilla extract. Mix until well combined.

4. Add the wet ingredients to the dry ingredients and stir until a smooth batter forms.

5. Divide the batter evenly among the prepared muffin cups, filling each about 2/3 full.

6. Bake for 20-25 minutes, or until a toothpick inserted into the center of a muffin comes out clean.

7. Remove the muffins from the oven and let them cool in the tin for 5 minutes before transferring them to a wire rack to cool completely.

8. Serve the muffins warm or at room temperature. Store any leftovers in an airtight container in the refrigerator for up to 5 days or in the freezer for up to 3 months.

Banana Nut Muffins

Banana Nut Muffins

These muffins are a perfect treat for those managing diabetes, as they’re made with ingredients like almond flour, ripe bananas, and natural sweeteners such as allulose or monk fruit extract. 

The moist, tender crumb of the muffin reveals a delightful combination of sweet, ripe banana and the satisfying crunch of nutty pecans. The natural sweeteners provide just the right amount of sweetness without raising blood sugar levels, making these muffins a guilt-free indulgence. 

Enjoying these Banana Nut Muffins over a leisurely breakfast, or as an afternoon snack, is a great way to share a deliciously sweet treat while prioritizing your health and well-being. These muffins are proof that with a few simple ingredient swaps, you can create delicious and satisfying baked goods that align with your dietary goals, allowing you to savor life’s little pleasures without compromise.

Ingredients

– 2 cups almond flour

– 1/2 cup allulose or monk fruit sweetener

– 1 tsp baking powder

– 1/2 tsp baking soda

– 1/4 tsp salt

– 1 tsp ground cinnamon

– 3 ripe bananas, mashed

– 2 large eggs

– 1/4 cup melted coconut oil or butter

– 1 tsp vanilla extract

– 1/2 cup chopped pecans

Instructions

1. Preheat your oven to 350°F (175°C). Line a 12-cup muffin tin with paper liners or grease with cooking spray.

2. In a large bowl, whisk together the almond flour, sweetener, baking powder, baking soda, salt, and cinnamon.

3. In a separate bowl, combine the mashed bananas, eggs, melted coconut oil or butter, and vanilla extract. Mix until well combined.

4. Add the wet ingredients to the dry ingredients and stir until a smooth batter forms. Fold in the chopped pecans.

5. Divide the batter evenly among the prepared muffin cups, filling each about 2/3 full.

6. Bake for 20-25 minutes, or until a toothpick inserted into the center of a muffin comes out clean.

7. Remove the muffins from the oven and let them cool in the tin for 5 minutes before transferring them to a wire rack to cool completely.

8. Serve the muffins warm or at room temperature. Store any leftovers in an airtight container in the refrigerator for up to 5 days or in the freezer for up to 3 months.

Chocolate Cupcakes with Salted caramel cream

Chocolate Cupcakes with Salted Caramel Cream

It’s a special occasion, perhaps a birthday or an anniversary, where you want to celebrate with a decadent treat that everyone can enjoy… and that includes those managing diabetes. 

As you unveil a platter of these exquisite Chocolate Cupcakes with Salted Caramel Cream, your guests can’t help but marvel at the beautifully piped swirls of caramel-infused cream atop the rich, dark chocolate cakes. 

As you take a bite, the moist, tender crumb of the almond flour cupcake melts in your mouth, perfectly complemented by the smooth, creamy frosting with just a hint of salt to balance the sweetness. 

These cupcakes prove that with a few clever ingredient swaps, like using almond flour and natural sweeteners such as allulose or monk fruit extract, you can create indulgent, satisfying desserts that align with your health goals. 

Sharing these delightful treats with your loved ones, you feel a sense of joy and contentment, knowing that everyone can enjoy them without risking their health. 

Ingredients

For the chocolate cupcakes:

– 2 cups almond flour

– 1/2 cup unsweetened cocoa powder

– 1/2 cup allulose or monk fruit sweetener

– 1 tsp baking powder

– 1/4 tsp salt

– 1/2 cup unsweetened almond milk

– 2 large eggs

– 1/4 cup melted coconut oil or butter

– 1 tsp vanilla extract

For the salted caramel cream:

– 1 cup heavy whipping cream

– 2 tbsp allulose or monk fruit sweetener

– 1 tsp vanilla extract

– 1/4 cup sugar-free caramel sauce

– 1/4 tsp sea salt

Instructions

1. Preheat your oven to 350°F (175°C). Line a 12-cup muffin tin with cupcake liners.

2. In a large bowl, whisk together the almond flour, cocoa powder, sweetener, baking powder, and salt.

3. In a separate bowl, combine the almond milk, eggs, melted coconut oil or butter, and vanilla extract. Whisk until well combined.

4. Add the wet ingredients to the dry ingredients and mix until a smooth batter forms.

5. Divide the batter evenly among the prepared cupcake liners, filling each about 2/3 full.

6. Bake for 18-20 minutes, or until a toothpick inserted into the center of a cupcake comes out clean.

7. Remove the cupcakes from the oven and let them cool in the tin for 5 minutes before transferring them to a wire rack to cool completely.

8. To make the salted caramel cream, beat the heavy whipping cream, sweetener, and vanilla extract in a large bowl until soft peaks form.

9. Gradually fold in the sugar-free caramel sauce and sea salt until well combined.

10. Once the cupcakes have cooled, pipe the salted caramel cream onto each cupcake using a piping bag fitted with a star tip.

11. Serve the cupcakes immediately or store them in the refrigerator for up to 3 days.

Red Velvet Cake

Red Velvet Cake

Red Velvet Cake is a delightful treat which can now be enjoyed by people managing diabetes or looking to reduce their carb intake. 

By using almond flour instead of traditional wheat flour and natural sweeteners. like allulose or monk fruit extract, we’ve created a version that’s still got a rich, velvety texture and vibrant red color but without skyrocketing your blood sugar.

Ingredients

For the cake:

– 2 1/2 cups almond flour

– 1/2 cup cocoa powder

– 1 tsp baking powder

– 1/2 tsp salt

– 1/2 cup unsalted butter, softened

– 3/4 cup allulose or monk fruit extract

– 4 large eggs

– 1 tsp vanilla extract

– 1 tbsp red food coloring (natural, if available)

– 1/2 cup unsweetened almond milk

– 1 tsp apple cider vinegar

For the frosting:

– 8 oz cream cheese, softened

– 1/4 cup unsalted butter, softened

– 1/2 cup allulose or monk fruit extract

– 1 tsp vanilla extract

Instructions

1. Preheat your oven to 350°F (175°C). Grease two 8-inch round cake pans and line the bottoms with parchment paper.

2. In a medium bowl, whisk together the almond flour, cocoa powder, baking powder, and salt.

3. In a large bowl, beat the softened butter and allulose or monk fruit extract until light and fluffy.

4. Add the eggs one at a time, beating well after each addition. Stir in the vanilla extract and red food coloring.

5. In a small bowl, combine the unsweetened almond milk and apple cider vinegar. Let sit for 5 minutes to create a “buttermilk.”

6. Alternately add the dry ingredients and the “buttermilk” to the butter mixture, beginning and ending with the dry ingredients. Mix until just combined.

7. Divide the batter evenly between the prepared cake pans. Bake for 25-30 minutes, or until a toothpick inserted into the center comes out clean.

8. Allow the cakes to cool in the pans for 10 minutes before turning them out onto a wire rack to cool completely.

9. For the frosting, beat the softened cream cheese, butter, allulose or monk fruit extract, and vanilla extract until smooth and creamy.

10. Once the cakes have cooled, place one layer on a serving plate and spread a layer of frosting on top. Place the second cake layer on top and frost the top and sides of the cake with the remaining frosting.

11. Refrigerate the cake for at least 30 minutes before serving to allow the frosting to set.

Pineapple Upside-Down Cake

Pineapple Upside Down Cake

This diabetic-friendly Pineapple Upside Down Cake is a delightful twist on the classic dessert, perfect for those managing diabetes or looking to reduce their sugar intake.

The caramelized pineapple topping and tender vanilla cake come together to create a delicious and visually appealing dessert that will satisfy your sweet tooth without compromising your health.

Pineapple can be safe for people with diabetes when consumed in moderation as part of a balanced diet. But please note that pineapple has a medium glycemic index (GI) score of 66, which means it can have a moderate effect on blood sugar levels.

So please dont go overboard with your portion sizes!

Ingredients

Pineapple Topping

– 1/4 cup unsalted butter

– 1/3 cup allulose or monk fruit sweetener

– 1 (20-ounce) can pineapple slices in juice, drained and juice reserved

– Maraschino cherries (optional)

Vanilla Cake

– 1 1/2 cups all-purpose flour

– 1 tsp baking powder

– 1/4 tsp salt

– 1/2 cup unsalted butter, softened

– 3/4 cup allulose or monk fruit sweetener

– 2 large eggs

– 1 tsp vanilla extract

– 1/2 cup reserved pineapple juice

Instructions

1. Preheat the oven to 350°F (175°C). Grease a 9-inch round cake pan.

2. For the pineapple topping, melt the butter in a small saucepan over medium heat. Stir in the sweetener and cook until dissolved. Pour the mixture into the prepared cake pan, spreading it evenly.

3. Arrange the pineapple slices in a single layer on top of the butter-sweetener mixture. Place a maraschino cherry in the center of each pineapple slice, if desired.

4. In a medium bowl, whisk together the flour, baking powder, and salt.

5. In a large bowl, beat the softened butter and sweetener until light and fluffy. Add the eggs one at a time, beating well after each addition. Stir in the vanilla extract.

6. Gradually add the flour mixture to the butter mixture, alternating with the reserved pineapple juice. Mix until just combined.

7. Pour the batter evenly over the pineapple slices in the cake pan.

8. Bake for 40-45 minutes, or until a toothpick inserted into the center of the cake comes out clean.

9. Allow the cake to cool in the pan for 10 minutes. Run a knife around the edge of the pan to loosen the cake, then invert it onto a serving plate.

10. Serve warm or at room temperature.

Puff Pastry Tarts with Fruit

Fruit Tarts with Almond Flour Puff Pastry Recipe

These Fruit Tarts are an excellent choice for those following a diabetic diet. The almond flour puff pastry provides healthy fats, protein, and fiber, while the natural sweeteners like allulose or monk fruit extract add sweetness without raising blood sugar levels.

The fresh, colorful fruits add a burst of natural sweetness, vitamins, and antioxidants, perfectly complementing the flaky puff pastry and the creamy, dreamy vanilla filling.

As you enjoy each stunning bite, you can take pleasure in knowing that you’re nourishing your body with a wholesome and satisfying treat that supports your health goals while embracing the simple joys of a perfect summer brunch spent with loved ones.

Ingredients

For the almond flour puff pastry:

– 1 1/2 cups almond flour

– 1/4 cup coconut flour

– 1/4 tsp salt

– 1/4 cup unsalted butter, chilled and diced

– 1 large egg

– 2 tbsp cold water

For the vanilla cream filling:

– 1 cup heavy cream

– 1/4 cup allulose or monk fruit sweetener

– 1 tsp vanilla extract

– 4 oz cream cheese, softened

For the fruit topping:

– 2 kiwis, peeled and sliced

– 1 cup strawberries, sliced

– 1/2 cup blueberries

Instructions

1. In a food processor, pulse together the almond flour, coconut flour, and salt for the puff pastry.

2. Add the chilled, diced butter and pulse until the mixture resembles coarse crumbs.

3. In a small bowl, whisk together the egg and cold water. Add this mixture to the food processor and pulse until a dough forms.

4. Wrap the dough in plastic wrap and refrigerate for at least 30 minutes.

5. Preheat your oven to 400°F (200°C). Grease a 6-cup muffin tin.

6. On a surface dusted with almond flour, roll out the chilled dough to about 1/8-inch thickness. Using a 4-inch round cookie cutter or a small bowl as a guide, cut out circles of dough.

7. Press the dough circles into the prepared muffin tin, forming tart shells. Prick the bottom of each tart shell with a fork.

8. Bake the tart shells for 10-12 minutes, or until golden brown. Allow them to cool completely in the tin.

9. In a large bowl, beat the heavy cream, sweetener, and vanilla extract for the filling until stiff peaks form.

10. In a separate bowl, beat the cream cheese until smooth. Gently fold the whipped cream mixture into the cream cheese until well combined.

11. Spoon or pipe the vanilla cream filling into the cooled tart shells.

12. Arrange the sliced kiwis, strawberries, and blueberries on top of the filled tarts in a decorative pattern.

13. Serve the tarts immediately or store them in the refrigerator for up to 2 hours before serving.

Tiramisu Semifreddo

Creamy Semifreddo Tiramisu

Transport your taste buds to the heart of Italy with this luxurious and irresistible Diabetic-Friendly recipe for Tiramisu Semifreddo! 

This recipe captures the essence of the classic Italian dessert while using natural sweeteners like Allulose or monk fruit extract and nutrient-dense almond flour to create a guilt-free indulgence. 

The creamy, velvety texture of the semifreddo is infused with the rich flavors of espresso and cocoa, creating a harmonious balance that will delight your taste buds. While the addition of almond flour not only provides a boost of healthy fats but also adds a subtle nutty flavor that complements the coffee and chocolate notes perfectly. 

Whether you’re looking to impress dinner guests or simply treat yourself to a decadent dessert, this Tiramisu Semifreddo is sure to become a new favorite. 

Ingredients

Almond Flour Sponge Cake

– 4 large eggs, separated

– 1/4 cup Allulose or 1 tsp monk fruit extract

– 1/2 cup almond flour

– 1/4 tsp salt

– 1 tsp instant espresso powder

– 1 tsp unsweetened cocoa powder

Semifreddo

– 1 1/2 cups heavy cream

– 1/2 cup Allulose or 2 tsp monk fruit extract

– 1/2 cup mascarpone cheese, softened

– 1 tsp vanilla extract

– 1/4 cup strong brewed espresso, cooled

– 2 tbsp unsweetened cocoa powder

Instructions

1. Preheat the oven to 350°F (175°C) and line a 9×5-inch loaf pan with parchment paper, allowing the excess to hang over the sides.

2. For the almond flour sponge cake, beat the egg yolks and Allulose or monkfruit extract in a large bowl until light and fluffy.

3. In a separate bowl, whisk together the almond flour, salt, instant espresso powder, and cocoa powder.

4. Fold the dry ingredients into the egg yolk mixture until well combined.

5. In another bowl, beat the egg whites until stiff peaks form. Gently fold the egg whites into the batter until no streaks remain.

6. Pour the batter into the prepared loaf pan and bake for 20-25 minutes, or until a toothpick inserted into the center comes out clean. Allow the cake to cool completely.

7. For the semifreddo, whip the heavy cream and Allulose or monk fruit extract in a large bowl until stiff peaks form.

8. In a separate bowl, beat the mascarpone cheese and vanilla extract until smooth.

9. Fold the whipped cream into the mascarpone mixture until well combined.

10. Cut the cooled almond flour sponge cake into 1-inch cubes and arrange half of them in the bottom of the loaf pan.

11. Brush the cake cubes with half of the cooled espresso and sprinkle with 1 tablespoon of cocoa powder.

12. Spread half of the semifreddo mixture evenly over the cake cubes.

13. Repeat the layers with the remaining cake cubes, espresso, cocoa powder, and semifreddo mixture.

14. Cover the loaf pan with plastic wrap and freeze for at least 6 hours, or preferably overnight.

15. When ready to serve, use the overhanging parchment paper to lift the semifreddo out of the pan. Slice and serve immediately, garnished with additional cocoa powder or shaved sugar-free chocolate, if desired.

Raspberry Danish Pastries

Gooey Danish Strawberry Pastries Recipe

These diabetic-friendly Raspberry Danish Pastries are a delightful and indulgent treat that’s perfect for those managing diabetes or looking to reduce their sugar intake.

By using natural sweeteners like allulose or monk fruit extract, we’ve created a flaky and delicious pastry that’s lower in carbs and calories.

The tart and juicy raspberry filling complements the buttery, tender pastry, making these danish pastries a satisfying and healthy breakfast or dessert option.

Go ahead and experiment with different fruit fillings, such as blueberries or strawberries, to create your own unique danish pastries.

Enjoy these delightful treats in moderation as part of a balanced diabetic diet.

Ingredients

Pastry Dough

– 1 1/2 cups almond flour

– 1/4 tsp salt

– 1/2 cup unsalted butter, cold and cubed

– 1/4 cup allulose or monk fruit sweetener

– 1/4 cup cold water

Raspberry Filling

– 1 1/2 cups fresh or frozen raspberries

– 1/4 cup allulose or monk fruit sweetener

– 1 tbsp cornstarch

– 1 tbsp lemon juice

Egg Wash

– 1 large egg

– 1 tbsp water

Instructions

1. In a food processor, pulse together the flour and salt. Add the cold, cubed butter and sweetener, and pulse until the mixture resembles coarse crumbs.

2. Gradually add the cold water, pulsing until the dough comes together.

3. Turn the dough out onto a lightly floured surface and knead gently until smooth. Wrap the dough in plastic wrap and refrigerate for at least 30 minutes.

4. In a saucepan, combine the raspberries, sweetener, cornstarch, and lemon juice. Cook over medium heat, stirring constantly, until the mixture thickens and the raspberries break down. Remove from heat and let cool.

5. Preheat the oven to 400°F (200°C). Line a baking sheet with parchment paper.

6. On a lightly floured surface, roll out the chilled dough into a 12×16-inch rectangle. Cut the dough into 8 equal squares.

7. Place a spoonful of the raspberry filling in the center of each square. Fold the corners of the dough towards the center, pinching the edges to seal.

8. In a small bowl, whisk together the egg and water to make an egg wash. Brush the egg wash over the pastries.

9. Bake for 18-20 minutes, or until the pastries are golden brown.

10. Allow the pastries to cool on the baking sheet for 5 minutes before transferring them to a wire rack to cool completely.

Red Velvet Cake

Red Velvet Cake

Red Velvet Cake is a delightful treat which can now be enjoyed by people managing diabetes or looking to reduce their carb intake. 

Red velvet cake is perfect for special occasions like birthdays, weddings, anniversaries, and Valentine’s Day. Its rich flavor and striking appearance make it a popular choice for celebrations where a luxurious and visually appealing dessert is desired.

By using almond flour instead of traditional wheat flour and natural sweeteners. like allulose or monk fruit extract, we’ve created a version that’s still got a rich, velvety texture and vibrant red color but without skyrocketing your blood sugar.

Ingredients

For the cake:

– 2 1/2 cups almond flour

– 1/2 cup cocoa powder

– 1 tsp baking powder

– 1/2 tsp salt

– 1/2 cup unsalted butter, softened

– 3/4 cup allulose or monk fruit extract

– 4 large eggs

– 1 tsp vanilla extract

– 1 tbsp red food coloring (natural, if available)

– 1/2 cup unsweetened almond milk

– 1 tsp apple cider vinegar

For the frosting:

– 8 oz cream cheese, softened

– 1/4 cup unsalted butter, softened

– 1/2 cup allulose or monk fruit extract

– 1 tsp vanilla extract

Instructions

1. Preheat your oven to 350°F (175°C). Grease two 8-inch round cake pans and line the bottoms with parchment paper.

2. In a medium bowl, whisk together the almond flour, cocoa powder, baking powder, and salt.

3. In a large bowl, beat the softened butter and allulose or monk fruit extract until light and fluffy.

4. Add the eggs one at a time, beating well after each addition. Stir in the vanilla extract and red food coloring.

5. In a small bowl, combine the unsweetened almond milk and apple cider vinegar. Let sit for 5 minutes to create a “buttermilk.”

6. Alternately add the dry ingredients and the “buttermilk” to the butter mixture, beginning and ending with the dry ingredients. Mix until just combined.

7. Divide the batter evenly between the prepared cake pans. Bake for 25-30 minutes, or until a toothpick inserted into the center comes out clean.

8. Allow the cakes to cool in the pans for 10 minutes before turning them out onto a wire rack to cool completely.

9. For the frosting, beat the softened cream cheese, butter, allulose or monk fruit extract, and vanilla extract until smooth and creamy.

10. Once the cakes have cooled, place one layer on a serving plate and spread a layer of frosting on top. Place the second cake layer on top and frost the top and sides of the cake with the remaining frosting.

11. Refrigerate the cake for at least 30 minutes before serving to allow the frosting to set.

Pineapple Upside-Down Cake

Pineapple Upside Down Cake

This diabetic-friendly Pineapple Upside Down Cake is a delightful twist on the classic dessert, perfect for those managing diabetes or looking to reduce their sugar intake.

The caramelized pineapple topping and tender vanilla cake come together to create a delicious and visually appealing dessert that will satisfy your sweet tooth without compromising your health.

Pineapple can be safe for people with diabetes when consumed in moderation as part of a balanced diet.

Ingredients

Pineapple Topping

– 1/4 cup unsalted butter

– 1/3 cup allulose or monk fruit sweetener

– 1 (20-ounce) can pineapple slices in juice, drained and juice reserved

– Maraschino cherries (optional)

Vanilla Cake

– 1 1/2 cups all-purpose flour

– 1 tsp baking powder

– 1/4 tsp salt

– 1/2 cup unsalted butter, softened

– 3/4 cup allulose or monk fruit sweetener

– 2 large eggs

– 1 tsp vanilla extract

– 1/2 cup reserved pineapple juice

Instructions

1. Preheat the oven to 350°F (175°C). Grease a 9-inch round cake pan.

2. For the pineapple topping, melt the butter in a small saucepan over medium heat. Stir in the sweetener and cook until dissolved. Pour the mixture into the prepared cake pan, spreading it evenly.

3. Arrange the pineapple slices in a single layer on top of the butter-sweetener mixture. Place a maraschino cherry in the center of each pineapple slice, if desired.

4. In a medium bowl, whisk together the flour, baking powder, and salt.

5. In a large bowl, beat the softened butter and sweetener until light and fluffy. Add the eggs one at a time, beating well after each addition. Stir in the vanilla extract.

6. Gradually add the flour mixture to the butter mixture, alternating with the reserved pineapple juice. Mix until just combined.

7. Pour the batter evenly over the pineapple slices in the cake pan.

8. Bake for 40-45 minutes, or until a toothpick inserted into the center of the cake comes out clean.

9. Allow the cake to cool in the pan for 10 minutes. Run a knife around the edge of the pan to loosen the cake, then invert it onto a serving plate.

10. Serve warm or at room temperature.

Note that pineapple has a medium glycemic index (GI) score of 66, which means it can have a moderate effect on blood sugar levels.

So please dont go overboard with your portion sizes!

Skip to content