web analytics
Puff Pastry Tarts with Fruit

Fruit Tarts with Almond Flour Puff Pastry Recipe

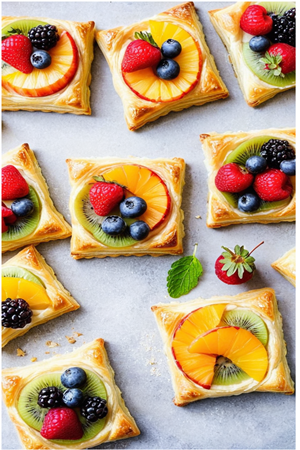
These Fruit Tarts are an excellent choice for those following a diabetic diet. The almond flour puff pastry provides healthy fats, protein, and fiber, while the natural sweeteners like allulose or monk fruit extract add sweetness without raising blood sugar levels.

The fresh, colorful fruits add a burst of natural sweetness, vitamins, and antioxidants, perfectly complementing the flaky puff pastry and the creamy, dreamy vanilla filling.

As you enjoy each stunning bite, you can take pleasure in knowing that you’re nourishing your body with a wholesome and satisfying treat that supports your health goals while embracing the simple joys of a perfect summer brunch spent with loved ones.

Ingredients

For the almond flour puff pastry:

– 1 1/2 cups almond flour

– 1/4 cup coconut flour

– 1/4 tsp salt

– 1/4 cup unsalted butter, chilled and diced

– 1 large egg

– 2 tbsp cold water

For the vanilla cream filling:

– 1 cup heavy cream

– 1/4 cup allulose or monk fruit sweetener

– 1 tsp vanilla extract

– 4 oz cream cheese, softened

For the fruit topping:

– 2 kiwis, peeled and sliced

– 1 cup strawberries, sliced

– 1/2 cup blueberries

Instructions

1. In a food processor, pulse together the almond flour, coconut flour, and salt for the puff pastry.

2. Add the chilled, diced butter and pulse until the mixture resembles coarse crumbs.

3. In a small bowl, whisk together the egg and cold water. Add this mixture to the food processor and pulse until a dough forms.

4. Wrap the dough in plastic wrap and refrigerate for at least 30 minutes.

5. Preheat your oven to 400°F (200°C). Grease a 6-cup muffin tin.

6. On a surface dusted with almond flour, roll out the chilled dough to about 1/8-inch thickness. Using a 4-inch round cookie cutter or a small bowl as a guide, cut out circles of dough.

7. Press the dough circles into the prepared muffin tin, forming tart shells. Prick the bottom of each tart shell with a fork.

8. Bake the tart shells for 10-12 minutes, or until golden brown. Allow them to cool completely in the tin.

9. In a large bowl, beat the heavy cream, sweetener, and vanilla extract for the filling until stiff peaks form.

10. In a separate bowl, beat the cream cheese until smooth. Gently fold the whipped cream mixture into the cream cheese until well combined.

11. Spoon or pipe the vanilla cream filling into the cooled tart shells.

12. Arrange the sliced kiwis, strawberries, and blueberries on top of the filled tarts in a decorative pattern.

13. Serve the tarts immediately or store them in the refrigerator for up to 2 hours before serving.

Tiramisu Semifreddo

Creamy Semifreddo Tiramisu

Transport your taste buds to the heart of Italy with this luxurious and irresistible Diabetic-Friendly recipe for Tiramisu Semifreddo! 

This recipe captures the essence of the classic Italian dessert while using natural sweeteners like Allulose or monk fruit extract and nutrient-dense almond flour to create a guilt-free indulgence. 

The creamy, velvety texture of the semifreddo is infused with the rich flavors of espresso and cocoa, creating a harmonious balance that will delight your taste buds. While the addition of almond flour not only provides a boost of healthy fats but also adds a subtle nutty flavor that complements the coffee and chocolate notes perfectly. 

Whether you’re looking to impress dinner guests or simply treat yourself to a decadent dessert, this Tiramisu Semifreddo is sure to become a new favorite. 

Ingredients

Almond Flour Sponge Cake

– 4 large eggs, separated

– 1/4 cup Allulose or 1 tsp monk fruit extract

– 1/2 cup almond flour

– 1/4 tsp salt

– 1 tsp instant espresso powder

– 1 tsp unsweetened cocoa powder

Semifreddo

– 1 1/2 cups heavy cream

– 1/2 cup Allulose or 2 tsp monk fruit extract

– 1/2 cup mascarpone cheese, softened

– 1 tsp vanilla extract

– 1/4 cup strong brewed espresso, cooled

– 2 tbsp unsweetened cocoa powder

Instructions

1. Preheat the oven to 350°F (175°C) and line a 9×5-inch loaf pan with parchment paper, allowing the excess to hang over the sides.

2. For the almond flour sponge cake, beat the egg yolks and Allulose or monkfruit extract in a large bowl until light and fluffy.

3. In a separate bowl, whisk together the almond flour, salt, instant espresso powder, and cocoa powder.

4. Fold the dry ingredients into the egg yolk mixture until well combined.

5. In another bowl, beat the egg whites until stiff peaks form. Gently fold the egg whites into the batter until no streaks remain.

6. Pour the batter into the prepared loaf pan and bake for 20-25 minutes, or until a toothpick inserted into the center comes out clean. Allow the cake to cool completely.

7. For the semifreddo, whip the heavy cream and Allulose or monk fruit extract in a large bowl until stiff peaks form.

8. In a separate bowl, beat the mascarpone cheese and vanilla extract until smooth.

9. Fold the whipped cream into the mascarpone mixture until well combined.

10. Cut the cooled almond flour sponge cake into 1-inch cubes and arrange half of them in the bottom of the loaf pan.

11. Brush the cake cubes with half of the cooled espresso and sprinkle with 1 tablespoon of cocoa powder.

12. Spread half of the semifreddo mixture evenly over the cake cubes.

13. Repeat the layers with the remaining cake cubes, espresso, cocoa powder, and semifreddo mixture.

14. Cover the loaf pan with plastic wrap and freeze for at least 6 hours, or preferably overnight.

15. When ready to serve, use the overhanging parchment paper to lift the semifreddo out of the pan. Slice and serve immediately, garnished with additional cocoa powder or shaved sugar-free chocolate, if desired.

Raspberry Danish Pastries

Gooey Danish Strawberry Pastries Recipe

These diabetic-friendly Raspberry Danish Pastries are a delightful and indulgent treat that’s perfect for those managing diabetes or looking to reduce their sugar intake.

By using natural sweeteners like allulose or monk fruit extract, we’ve created a flaky and delicious pastry that’s lower in carbs and calories.

The tart and juicy raspberry filling complements the buttery, tender pastry, making these danish pastries a satisfying and healthy breakfast or dessert option.

Go ahead and experiment with different fruit fillings, such as blueberries or strawberries, to create your own unique danish pastries.

Enjoy these delightful treats in moderation as part of a balanced diabetic diet.

Ingredients

Pastry Dough

– 1 1/2 cups almond flour

– 1/4 tsp salt

– 1/2 cup unsalted butter, cold and cubed

– 1/4 cup allulose or monk fruit sweetener

– 1/4 cup cold water

Raspberry Filling

– 1 1/2 cups fresh or frozen raspberries

– 1/4 cup allulose or monk fruit sweetener

– 1 tbsp cornstarch

– 1 tbsp lemon juice

Egg Wash

– 1 large egg

– 1 tbsp water

Instructions

1. In a food processor, pulse together the flour and salt. Add the cold, cubed butter and sweetener, and pulse until the mixture resembles coarse crumbs.

2. Gradually add the cold water, pulsing until the dough comes together.

3. Turn the dough out onto a lightly floured surface and knead gently until smooth. Wrap the dough in plastic wrap and refrigerate for at least 30 minutes.

4. In a saucepan, combine the raspberries, sweetener, cornstarch, and lemon juice. Cook over medium heat, stirring constantly, until the mixture thickens and the raspberries break down. Remove from heat and let cool.

5. Preheat the oven to 400°F (200°C). Line a baking sheet with parchment paper.

6. On a lightly floured surface, roll out the chilled dough into a 12×16-inch rectangle. Cut the dough into 8 equal squares.

7. Place a spoonful of the raspberry filling in the center of each square. Fold the corners of the dough towards the center, pinching the edges to seal.

8. In a small bowl, whisk together the egg and water to make an egg wash. Brush the egg wash over the pastries.

9. Bake for 18-20 minutes, or until the pastries are golden brown.

10. Allow the pastries to cool on the baking sheet for 5 minutes before transferring them to a wire rack to cool completely.

Red Velvet Cake

Red Velvet Cake

Red Velvet Cake is a delightful treat which can now be enjoyed by people managing diabetes or looking to reduce their carb intake. 

Red velvet cake is perfect for special occasions like birthdays, weddings, anniversaries, and Valentine’s Day. Its rich flavor and striking appearance make it a popular choice for celebrations where a luxurious and visually appealing dessert is desired.

By using almond flour instead of traditional wheat flour and natural sweeteners. like allulose or monk fruit extract, we’ve created a version that’s still got a rich, velvety texture and vibrant red color but without skyrocketing your blood sugar.

Ingredients

For the cake:

– 2 1/2 cups almond flour

– 1/2 cup cocoa powder

– 1 tsp baking powder

– 1/2 tsp salt

– 1/2 cup unsalted butter, softened

– 3/4 cup allulose or monk fruit extract

– 4 large eggs

– 1 tsp vanilla extract

– 1 tbsp red food coloring (natural, if available)

– 1/2 cup unsweetened almond milk

– 1 tsp apple cider vinegar

For the frosting:

– 8 oz cream cheese, softened

– 1/4 cup unsalted butter, softened

– 1/2 cup allulose or monk fruit extract

– 1 tsp vanilla extract

Instructions

1. Preheat your oven to 350°F (175°C). Grease two 8-inch round cake pans and line the bottoms with parchment paper.

2. In a medium bowl, whisk together the almond flour, cocoa powder, baking powder, and salt.

3. In a large bowl, beat the softened butter and allulose or monk fruit extract until light and fluffy.

4. Add the eggs one at a time, beating well after each addition. Stir in the vanilla extract and red food coloring.

5. In a small bowl, combine the unsweetened almond milk and apple cider vinegar. Let sit for 5 minutes to create a “buttermilk.”

6. Alternately add the dry ingredients and the “buttermilk” to the butter mixture, beginning and ending with the dry ingredients. Mix until just combined.

7. Divide the batter evenly between the prepared cake pans. Bake for 25-30 minutes, or until a toothpick inserted into the center comes out clean.

8. Allow the cakes to cool in the pans for 10 minutes before turning them out onto a wire rack to cool completely.

9. For the frosting, beat the softened cream cheese, butter, allulose or monk fruit extract, and vanilla extract until smooth and creamy.

10. Once the cakes have cooled, place one layer on a serving plate and spread a layer of frosting on top. Place the second cake layer on top and frost the top and sides of the cake with the remaining frosting.

11. Refrigerate the cake for at least 30 minutes before serving to allow the frosting to set.

Pineapple Upside-Down Cake

Pineapple Upside Down Cake

This diabetic-friendly Pineapple Upside Down Cake is a delightful twist on the classic dessert, perfect for those managing diabetes or looking to reduce their sugar intake.

The caramelized pineapple topping and tender vanilla cake come together to create a delicious and visually appealing dessert that will satisfy your sweet tooth without compromising your health.

Pineapple can be safe for people with diabetes when consumed in moderation as part of a balanced diet.

Ingredients

Pineapple Topping

– 1/4 cup unsalted butter

– 1/3 cup allulose or monk fruit sweetener

– 1 (20-ounce) can pineapple slices in juice, drained and juice reserved

– Maraschino cherries (optional)

Vanilla Cake

– 1 1/2 cups all-purpose flour

– 1 tsp baking powder

– 1/4 tsp salt

– 1/2 cup unsalted butter, softened

– 3/4 cup allulose or monk fruit sweetener

– 2 large eggs

– 1 tsp vanilla extract

– 1/2 cup reserved pineapple juice

Instructions

1. Preheat the oven to 350°F (175°C). Grease a 9-inch round cake pan.

2. For the pineapple topping, melt the butter in a small saucepan over medium heat. Stir in the sweetener and cook until dissolved. Pour the mixture into the prepared cake pan, spreading it evenly.

3. Arrange the pineapple slices in a single layer on top of the butter-sweetener mixture. Place a maraschino cherry in the center of each pineapple slice, if desired.

4. In a medium bowl, whisk together the flour, baking powder, and salt.

5. In a large bowl, beat the softened butter and sweetener until light and fluffy. Add the eggs one at a time, beating well after each addition. Stir in the vanilla extract.

6. Gradually add the flour mixture to the butter mixture, alternating with the reserved pineapple juice. Mix until just combined.

7. Pour the batter evenly over the pineapple slices in the cake pan.

8. Bake for 40-45 minutes, or until a toothpick inserted into the center of the cake comes out clean.

9. Allow the cake to cool in the pan for 10 minutes. Run a knife around the edge of the pan to loosen the cake, then invert it onto a serving plate.

10. Serve warm or at room temperature.

Note that pineapple has a medium glycemic index (GI) score of 66, which means it can have a moderate effect on blood sugar levels.

So please dont go overboard with your portion sizes!

Angel Food Cake

Angel Cake

Angel food cake is a light, airy dessert that traditionally relies on sugar to achieve its delicate texture. However, for those managing diabetes, enjoying this classic sweet treat can be challenging.

This diabetic-friendly version uses natural sweeteners like allulose and monk fruit extract to create a delightful, guilt-free dessert that won’t cause a blood sugar spike. Enjoy a slice of this heavenly cake without compromising on your dietary needs.

Ingredients

For the Cake:

  • 1 cup cake flour
  • 1 1/2 cups powdered allulose
  • 1/4 cup powdered monk fruit sweetener
  • 1 1/2 cups egg whites (about 11-12 large eggs), at room temperature
  • 1 1/2 teaspoons cream of tartar
  • 1/4 teaspoon salt
  • 1 teaspoon vanilla extract
  • 1/2 teaspoon almond extract

Instructions

  1. Preheat Oven:
    Preheat your oven to 350°F (175°C). Ensure your tube pan (angel food cake pan) is clean and dry. Do not grease the pan.
  2. Prepare the Dry Mixture:
    • Sift the cake flour and 3/4 cup of powdered allulose together three times. This helps to ensure a light and airy texture for the cake.
  3. Prepare the Egg Whites:
    • In a large mixing bowl, beat the egg whites, cream of tartar, and salt on medium speed until the mixture becomes frothy.
    • Gradually add the remaining 3/4 cup of powdered allulose and the powdered monk fruit sweetener, a tablespoon at a time, while continuing to beat the mixture.
    • Increase the mixer speed to high and beat until the egg whites form stiff, glossy peaks. Be careful not to overbeat.
    • Beat in the vanilla and almond extracts just until blended.
  4. Combine and Fold:
    • Sift about one-third of the flour mixture over the beaten egg whites. Gently fold the flour into the egg whites using a spatula.
    • Repeat this process two more times with the remaining flour mixture, folding gently each time until all the flour is incorporated and the mixture is smooth.
  5. Bake the Cake:
    • Spoon the batter evenly into the tube pan. Run a knife through the batter to eliminate any large air bubbles.
    • Bake in the preheated oven for 35-40 minutes, or until the top is golden brown and a toothpick inserted into the center comes out clean.
    • Immediately invert the pan onto a heatproof bottle or funnel and let the cake cool completely in the pan.
  6. Release and Serve:
    • Once the cake is completely cooled, run a knife around the edges of the pan and the center tube to release the cake.
    • Carefully remove the cake from the pan and place it on a serving plate.
    • Slice and enjoy plain, or serve with fresh berries and a dollop of sugar-free whipped cream if desired.

Angel cake is ideal for light, celebratory occasions like birthdays, baby showers, bridal showers, or afternoon tea parties.

Its airy texture and subtle sweetness make it a delightful treat for gatherings where a delicate, elegant dessert is appreciated. 

Coffee cake

Coffee cake recipe

Coffee cake is a classic dessert that pairs perfectly with your morning coffee or afternoon tea. 

For those managing diabetes, enjoying this sweet indulgence might seem challenging.  But due to it being sweetened with natural alternatives like allulose and monk fruit extract, this recipe allows you to enjoy the warm, comforting taste of coffee cake without worrying about a spike in your blood sugar levels.

Ingredients

For the Cake:

– 1 1/4 cups almond flour

– 1/2 cup coconut flour

– 1/2 cup allulose

– 1/4 cup monk fruit extract

– 1 teaspoon baking powder

– 1/2 teaspoon baking soda

– 1/2 teaspoon salt

– 1 teaspoon ground cinnamon

– 4 large eggs, at room temperature

– 1/2 cup unsweetened almond milk

– 1/4 cup melted coconut oil

– 1 teaspoon vanilla extract

For the Streusel Topping:

– 1/2 cup almond flour

– 1/4 cup chopped nuts (pecans or walnuts)

– 2 tablespoons allulose

– 1 tablespoon monk fruit extract

– 2 teaspoons ground cinnamon

– 3 tablespoons melted coconut oil

For the Glaze:

– 1/2 cup powdered monk fruit sweetener

– 2-3 teaspoons unsweetened almond milk

– 1/2 teaspoon vanilla extract

Instructions

1. Preheat Oven:

   Preheat your oven to 350°F (175°C). Grease an 8×8 inch square baking pan and line it with parchment paper.

2. Prepare the Streusel Topping:

   – In a small bowl, combine almond flour, chopped nuts, allulose, monk fruit extract, and ground cinnamon.

   – Add the melted coconut oil and mix until the mixture is crumbly.

   – Set aside.

3. Prepare the Cake:

   – In a large bowl, whisk together almond flour, coconut flour, allulose, monk fruit extract, baking powder, baking soda, salt, and ground cinnamon.

   – In another bowl, whisk together the eggs, unsweetened almond milk, melted coconut oil, and vanilla extract.

   – Gradually add the wet ingredients to the dry ingredients, stirring until just combined.

   – Pour the batter into the prepared baking pan and spread it out evenly.

4. Add the Streusel Topping:

   – Sprinkle the streusel topping evenly over the cake batter.

5. Bake the Cake:

   – Bake in the preheated oven for 30-35 minutes, or until a toothpick inserted into the center comes out clean.

   – Allow the cake to cool in the pan for about 15 minutes before transferring it to a wire rack to cool completely.

6. Prepare the Glaze:

   – In a small bowl, whisk together the powdered monk fruit sweetener, unsweetened almond milk, and vanilla extract until smooth.

   – Drizzle the glaze over the cooled coffee cake.

7. Serve and Enjoy:

   – Cut the cake into squares and serve. Enjoy your diabetic-friendly coffee cake alongside a cup of your favorite coffee or tea!

Blueberry Crumble Pie 

This diabetic-friendly recipe for Blueberry Crumble Pie features the natural sweetness of blueberries and uses alternative sweeteners to keep it low on the glycemic index.

Blueberry Crumble Pie is a delightful treat that combines the tartness of blueberries with a crunchy, buttery topping. For those managing diabetes, finding a dessert that satisfies the sweet tooth without causing a spike in blood sugar can be challenging. This recipe offers a solution by using ingredients that are lower in sugar and carbs, making it a suitable option for a diabetic diet.

Blueberries are a fantastic choice for a natural sweetener as they are low in sugar compared to other fruits and packed with antioxidants.

Ingredients
• 4 cups fresh blueberries
• 1 tsp lemon juice
• 1/4 cup granulated sweetener of choice (e.g., erythritol or monk fruit sweetener)
• 2 tbsp cornstarch
• 1 cup rolled oats
• 1/2 cup almond flour
• 1/4 cup cold butter, diced
• 1/4 cup granulated sweetener (for the topping)
• 1 tsp ground cinnamon

Instructions

  1. Preheat your oven to 375°F (190°C).
  2. In a bowl, toss the blueberries with lemon juice, 1/4 cup sweetener, and cornstarch until evenly coated.
  3. Transfer the blueberry mixture to a pie dish.
  4. In another bowl, mix the oats, almond flour, remaining sweetener, and cinnamon.
  5. Add the diced butter and mix until the mixture resembles coarse crumbs.
  6. Sprinkle the crumble topping over the blueberries.
  7. Bake for 25-30 minutes or until the topping is golden brown and the blueberries are bubbly.
  8. Allow to cool before serving.

Nutrition
While the exact nutritional content will depend on the specific ingredients used, a general estimate for a serving of this Blueberry Crumble Pie is approximately:
• Calories: 200-250 kcal
• Carbohydrates: 24-30g
• Protein: 3-4g
• Fat: 10-12g
• Fiber: 4-5g
• Sugars: 9-12g

Chocolate Dipped Biscotti biscuits

Chocolate-Dipped Almond Flour Biscotti (perfect for dipping in coffee)

You’re enjoying a cozy, quiet morning at home, the first rays of sunlight filtering through your kitchen window as you sit at your table, cradling a steaming mug of coffee. 

Beside your cup rests a plate of freshly baked Chocolate-Dipped Almond Flour Biscotti, their crisp, golden edges and rich, dark chocolate coating beckoning you to take a bite. 

As you dunk a biscotti into your warm beverage, you can’t help but smile, knowing that these delightful treats are not only satisfying but also crafted with wholesome ingredients like almond flour and natural sweeteners, making them a perfect indulgence for those managing diabetes. 

The biscotti’s delicate crunch gives way to a tender, slightly chewy center, the nutty notes of almond flour harmonizing perfectly with the deep, decadent flavor of the chocolate. Each bite is a moment of pure bliss, a delightful respite from the day’s responsibilities. 

These Chocolate-Dipped Almond Flour Biscotti are proof that with a few simple ingredient swaps, you can create delicious and satisfying treats that align with your health goals, allowing you to savor life’s little pleasures without compromise.

Ingredients

For the biscotti:

– 2 cups almond flour

– 1/2 cup allulose or monk fruit sweetener

– 1 tsp baking powder

– 1/4 tsp salt

– 2 large eggs

– 1 tsp vanilla extract

– 1/2 cup sliced almonds

For the chocolate dip:

– 4 oz sugar-free dark chocolate, chopped

– 1 tsp coconut oil

Instructions

1. Preheat your oven to 350°F (175°C). Line a baking sheet with parchment paper.

2. In a large bowl, whisk together the almond flour, sweetener, baking powder, and salt.

3. In a separate bowl, beat the eggs and vanilla extract until well combined.

4. Add the wet ingredients to the dry ingredients and mix until a dough forms. Fold in the sliced almonds.

5. Divide the dough in half and shape each half into a log, about 10 inches long and 2 inches wide, on the prepared baking sheet.

6. Bake for 25-30 minutes, or until the logs are golden brown and firm to the touch.

7. Remove the logs from the oven and let them cool on the baking sheet for 10 minutes.

8. Using a serrated knife, cut the logs diagonally into 1/2-inch thick slices.

9. Place the slices cut-side down on the baking sheet and return them to the oven. Bake for an additional 10-15 minutes, or until the biscotti are crisp and lightly golden.

10. Remove the biscotti from the oven and let them cool completely on a wire rack.

11. To make the chocolate dip, melt the chopped sugar-free dark chocolate and coconut oil in a double boiler or the microwave, stirring until smooth.

12. Dip one end of each biscotti into the melted chocolate, then place them on a parchment-lined baking sheet to set.

13. Once the chocolate has hardened, store the biscotti in an airtight container at room temperature for up to 1 week.

Diabetic friendly Chocolate Brownies. Yumm!

How’d you love to enjoy the rich and satisfying taste of chocolate brownies without worrying about your sugar levels?

Well, now you can with this diabetic-friendly version of the popular sweet treat.

These brownies are sweetened with natural sweeteners like Allulose and Monk fruit extract, offering a delightful treat that’s friendly for those managing diabetes.

Enjoy the classic fudgy texture and deep chocolate flavor in a healthier way.

Ingredients

• 1/2 cup almond flour

• 1/2 cup unsweetened cocoa powder

• 1/4 teaspoon baking powder

• 1/4 teaspoon salt

• 2 large eggs

• 1/2 cup Allulose

• 1/4 cup Monk fruit extract

• 1/2 cup unsalted butter, melted

• 1 teaspoon vanilla extract

Instructions

  1. Preheat your oven to 350°F (175°C) and line an 8-inch square baking pan with parchment paper.

2. In a medium bowl, whisk together the flour, cocoa powder, baking powder, and salt.

3. In a separate large bowl, beat the eggs, Allulose, and Monk fruit extract until well combined.

4. Add the melted butter and vanilla extract to the egg mixture and mix well.

5. Gradually fold in the dry ingredients until just combined; avoid overmixing.

6. Pour the batter into the prepared baking pan and smooth the top with a spatula.

7. Bake for 20-25 minutes, or until a toothpick inserted into the center comes out mostly clean with a few moist crumbs.

8. Allow the brownies to cool in the pan for 10 minutes, then transfer to a wire rack to cool completely.

9. Cut into squares and serve.

Enjoy your delicious, diabetic-friendly chocolate brownies that are sure to satisfy your sweet tooth while keeping your health in check!

Remember, moderation is key even with healthier versions of sweet treats.

Skip to content